 Q Labs MSP Automation
Part 2 in the Provisioning Packages series. If you haven’t built a package yet, start with Building a Provisioning Package, this article picks up where that one leaves off.
In the last article, we built a provisioning package. Now let’s use it to deploy a workstation, start to finish, with your RMM doing the heavy lifting. This is the deployment method we run in our own MSP, and it’s built for shops on a good RMM (Datto, Ninja, Connectwise, etc.) that haven’t made the Intune investment and don’t particularly want to.
This is written for owners and service managers, because the payoff here isn’t just speed. It’s that deployments become documentable, delegable, and consistent, the three things that let you hand deployment work to junior techs without holding your breath.
The theory: every deployment has three phases
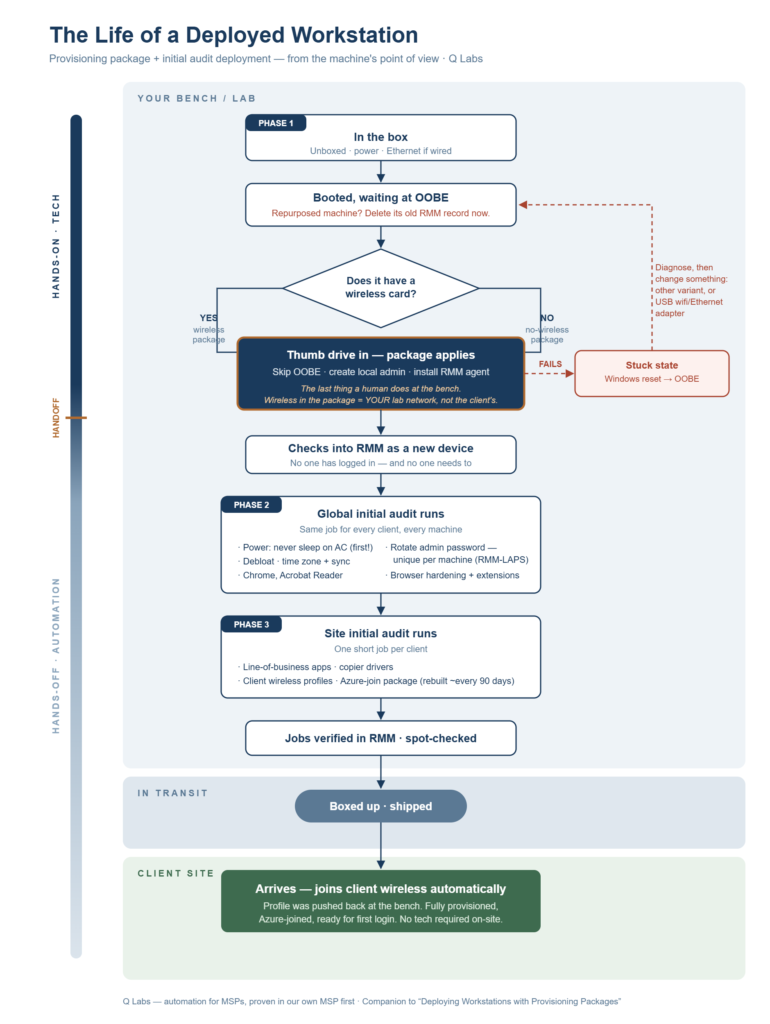
Before the how-to, a mental model. Every workstation deployment splits into three phases:
Phase 1: Physical. Unbox the machine, set it on the bench, plug it in. The stuff you can’t automate away no matter what.
Phase 2: Universal. Everything you do to every workstation you touch, regardless of client: your stack, your best practices, debloat, power settings. Same steps every time.
Phase 3: Client-specific. Everything unique to that client: line-of-business applications, the copier driver, their wireless networks.
Why bother splitting it up? Documentation. Phases 1 and 2 become one SOP that covers every deployment you’ll ever do. Phase 3 becomes one short SOP per client. When a new tech starts, they read one document plus a one-pager for whichever client they’re deploying for. That’s the whole training program.
The division of labor: package small, RMM big
Here’s the core principle of this entire method: provisioning packages break, so keep them as small as possible. Every setting you add to a package is another thing that can fail during apply, and when a package fails mid-apply, recovery is not fun (more on that later).
The RMM, on the other hand, is built for pushing configuration and software to endpoints, retrying failures, and reporting results. So the package does exactly one job: get the machine from out-of-box to a state where the RMM agent is running. Then the RMM takes over.
Our main provisioning package contains exactly three things:
- Skip the out-of-box experience (OOBE)
- Create a local admin account
- Install the RMM agent
That’s it. Pop the package on the root of a thumb drive, plug it into a machine sitting at OOBE, and it applies automatically: OOBE skipped, local account created, agent installed. The machine checks into your RMM and the automation takes it from there.
(Getting the Datto RMM installer into a package is a little convoluted — that’s covered in the first article.)
Why the local admin account is non-negotiable
I learned this one the hard way. Years back, I set up a machine with an Azure join during OOBE and no local account. The join went sideways, I couldn’t log in with Azure credentials, and there was no local account to fall back to. The only way out was a full Windows reset.
Microsoft’s own documentation now warns about exactly this: a package that attempts a directory join without creating a local account can leave the device unreachable if the join fails. Always create the local account. Always.
We use the same username on every machine (so techs always know what to look for) with a unique password per machine. More on how the passwords get unique in a minute, it’s one of the best parts of this method.
The wireless trap (and why you need two packages per client)
You can pre-populate a wireless network in a provisioning package, which is great for laptops. But here’s the catch: if that package runs on a desktop with no wireless card, the whole package fails. Not just the wireless part, the package.
So the rule is: two packages per client. One with a wireless profile, one without. Label the thumb drives.
Two more wireless notes from the field:
Carry the backup hardware. I keep a USB wireless adapter and a USB Ethernet adapter in the bag — something common like a Belkin, chosen specifically because it works with Windows’ in-box drivers, no install needed. Wrong package for the hardware in front of you? Don’t rebuild the package. Change the hardware and sail past.
The wireless network in the package is your network, not the client’s. You’re provisioning in your lab or office, so the package carries your guest or lab network. The client’s wireless profiles get deployed later by the RMM (Phase 3), so the machine connects automatically the moment it arrives on-site.
Phase 2: the global initial audit job
Datto RMM has a job type called an initial audit; it fires when a machine is newly discovered in the RMM. That’s our delivery mechanism. One global initial audit job, applied across all clients, runs your entire Phase 2 the moment the agent checks in.
The underrated superpower here: this automation runs before anyone has ever logged into the machine. Some provisioning-package payloads only apply at first login; RMM automation doesn’t wait. You end up with a cleaner endpoint because the machine is fully prepped before a human touches it.
What goes in ours:
- Power settings: do this one first. Set the machine to never sleep on AC power. If you skip this, the machine dozes off halfway through your automation and you can’t reach it to finish. Learn from our pain.
- Debloat. Ours was refined over years; there are solid public debloat scripts you can adapt to your standards and deploy as a component.
- Time zone and time sync.
- Rotate the local admin password. The package created the account with a known password; the RMM immediately changes it to a unique password per machine. This is essentially RMM-native LAPS, and it matters more than it sounds. Unique local admin passwords shut down pass-the-hash lateral movement, which means one compromised workstation can’t unlock the rest of the fleet. Anything that keeps a client from a complete meltdown is worth the setup time.
- The always-asked-for apps. Chrome and Acrobat Reader, because users request them often enough that you might as well.
- Browser hardening. Force your extensions in, set the homepage, and disable password saving in browsers, especially if you offer your clients a password manager.
A warning about job ordering: Datto RMM is supposed to run jobs sequentially. In practice, it absolutely does not. Send multiple jobs to an endpoint and they run when they feel like it. Build every component so it works regardless of what ran before it. Don’t design anything that depends on strict order.
A quirk about repurposed machines: the initial audit only fires for machines the RMM considers new. If you wipe and redeploy a computer that already had an RMM record, the RMM recognizes it, so no initial audit. Delete the old record first. It’s working as designed, but it bites everyone once.
Phase 3: the site-specific initial audit job
Alongside the global job, each client gets their own site-specific initial audit job with everything unique to them: line-of-business applications, the copier driver, and their wireless network profiles (which is how a machine provisioned in your lab connects automatically the moment it hits the client’s office).
The rule of thumb for what goes where: only put something in the global job if you’d defend it for 100% of clients. The moment one client doesn’t want a global item, you’re removing it from global and re-adding it to every site-specific job. That is tedious enough that “when in doubt, site-specific” is the right default.
The Azure join: do it separately, and here’s why
You can Azure-join in the main package during OOBE. I don’t recommend it, for one big reason: the bulk enrollment token you generate when building the package expires. The token technically supports up to 180 days, but Windows Configuration Designer’s interface only lets you set an expiry about 90 days out. So in practice, you’re on a ~90-day clock. Put the join in every client’s main package and you’re rebuilding every package for every client every 90 days.
Instead: build a separate, stripped-down provisioning package that does nothing but the Azure join, and push it down through the client’s site-specific initial audit job. Same 90-day clock, but now it’s one small package per client on a scheduled rebuild, a perfectly manageable recurring task for whoever owns it.
And here’s the part that should make owners sit up: junior techs can now Azure-join machines without ever touching admin credentials. A senior tech builds the join package; anyone can apply it. The credentials live inside the package, never in a junior tech’s head or password manager. That’s least-privilege delegation with zero extra tooling.
One more safety valve: creating a bulk enrollment package creates a package_{GUID} user account in your Entra tenant. Delete that account and the package is revoked instantly, useful if a thumb drive walks off, and something to add to your client offboarding checklist.
When it goes horribly wrong
It will, occasionally. Here’s the failure landscape:
The stuck state. Sometimes a package fails mid-apply and the machine lands in a limbo where the only exit is a Windows reset back to OOBE. The most common cause in my experience is wireless, the desktop-without-a-wireless-card problem from earlier. If you just run the same package again, you’re in a loop.
The retry play: diagnose, then change something. The error messages are usually good enough to point you at the cause. Wrong package variant? Grab the other thumb drive. Connectivity problem? Plug in the USB adapter. Understand why it failed, do it a different way, and it goes through.
The reset checkbox; a genuine trade-off. When building a package there’s an option to run a Windows reset at the very start of provisioning. The upside: it strips OEM bloatware, the Dell, HP, and Lenovo additions that your debloat script doesn’t touch, because debloat scripts target Windows bloat. The downside: it adds fifteen to twenty minutes per machine. I’ve run it both ways and haven’t landed on a universal answer; do the math for your own shop’s volume and decide.
The missing storage driver. On some heavier hardware (Dell rugged Latitudes, Precision workstations) a reset drops you into Windows setup that can’t see the hard drive, because the Intel Rapid Storage driver isn’t in the Windows image. A tech has to fetch drivers and manually continue. To be fair, this is a Windows reset problem, not a provisioning package problem; you’d hit it resetting the machine any other way. But know it exists so it doesn’t eat an afternoon.
The honest Intune comparison
Everyone has a favorite tool, and there’s more than one way to solve almost every problem in this business. So, honestly:
Intune is very powerful. If you have the staffing and the expertise, it’s a solid way to do this, including the hybrid pattern where Intune deploys the RMM agent and the RMM handles everything else. That’s a legitimately strong architecture.
But Intune costs manpower. Every tech in your shop is comfortable in the RMM. Count how many are genuinely comfortable in Intune. For me, it also has the habit of relocating its settings right about the time I’ve finally learned where they are. I stuck with RMM-native because RMM is where my team already lives.
And watch the offboarding trap. If you deploy your RMM agent through a client’s Intune and later lose the client, forgetting to remove that installer means ex-client machines keep enrolling into your RMM and running your initial audit jobs. If the incoming MSP doesn’t know Intune well enough to fix it, you’re fielding calls from people who don’t even pay you anymore. If you go the Intune route, build the unwind into your offboarding checklist from day one. The thumb-drive method sidesteps this entire class of problem: there’s nothing persistent living in the client’s tenant.
Neither answer is wrong. The question is which one fits your team.
Putting it all together
The full flow, bench to desk:
- Unbox, plug in, boot to OOBE (Phase 1)
- Thumb drive in; package skips OOBE, creates the local admin, installs the RMM agent
- Machine checks into the RMM as a new device
- Global initial audit fires: power, debloat, time, apps, browser hardening, password rotation (Phase 2)
- Site-specific initial audit fires: LOB apps, drivers, client wireless profiles, Azure join package (Phase 3)
- Machine ships to the client and connects to their wireless on arrival
One SOP for steps 1–4, forever. One short SOP per client for step 5. A junior tech can run the whole thing without ever seeing an admin credential.
Q Labs runs this exact process inside our own MSP — it’s the proving ground for everything we build. If you’d rather have it implemented for you than build it yourself, that’s what Endpoint Automation is.