Workstation setup is the process of preparing a computer for deployment at a client’s site. It includes all the work from unboxing to installing the company wide software. The next step is Workstation Deployment where you perform the steps necessary to get a particular user up and running.
Workstation setup has three distinct phases.
Phase1: Hands on. This is everything from unboxing the computer to installing the RMM agent. A lot of this work can be automated using InTune and AutoPilot. Take note of the amount of time you spend on this phase to weigh the expense of manual setup against the cost of InTune/AutoPilot.
Phase2: This is where you perform all the steps that you do to all workstations. Installing your stack, renaming the computer, hardening and best practices.
Phase3: In this phase, you will do all the steps required for the particular client. LOB applications, Domain Join, etc. You will likely have a separate Phase3 SOP for each client.
When complete, the workstation is ready to be deployed to a user. Deployment SOPs are found here.
**Train your most junior technicians in this phase, the rest can be done remotely.
Physical Setup – Unbox and plugin workstation on testing bench or at the clients office.
Asset Tag – Using naming convention, print and attach asset label. (we recommend using a different color label for this, it makes it easier to have a user find it when on the phone. We use White Text on a Blue Label). Note the serial numbers and desired hostnames on the ticket so you have the info later.
DeCrappify / Debloat – When the machine is first powered on and enters the OOBE (Out of box experience) switch to Audit mode with Ctrl – Shift – F3. The computer will reboot into Audit Mode.
*if you missed this step and already logged into the computer, you can clear it off by running sysprep. C:\windows\system32\sysprep\sysprep.exe Select the options to reboot into audit mode. This will remove all user content and reset Windows back to default, make sure you back up anything you may have put on the machine.
When the computer boots into Audit mode, you will see the Sysprep window sitting right in the middle of the screen, leave it there for now.
Launch a web browser and download your companies version of DeCrappifier and the RMM agent installer for the device. Save them to your scratch folder (C:\bt)
Run Powershell as admin navigate to the scratch folder. Rename the DeCrappifier text file to a ps1 file with the command “move .\<name of decrappifier>.txt .\<name of decrappifier>.ps1
Set the execution policy to allow the script to run with the command “set-executionpolicy unrestricted”
Run the DeCrappifier script, adding the -tablet switch if the device has a touchscreen. .\<name of decrappifier>.ps1 -tablet
Enter “R” to run once.
When finished, set the execution policy back to restricted with the command “set-executionpolicy restricted”
Close Powershell, and select Reboot from the Sysprep Window. You will not return to the OOBE.
Configure computer and privacy settings – Accept licenses, keyboard layout etc. Turn off all sliders that ask for tracking information.
Do not log in as Azure user, or with a Microsoft account. Select “Set up for an Organization”
At the “Sign in with Microsoft” screen, select “Domain Join Instead” link at the bottom of the window.
Enter your default local admin credentials for “Who is going to use this PC?” prompts.
Decline Cortana, Decline activity History, If its a dell and you have to enter details for “Support and Protection” enter the default details for your MSP. We use Hardware@ourmsp.com
Computer will not boot into windows.
Install RMM agent – Navigate to your scratch folder and install the RMM agent you downloaded earlier.
Locate the device in your RMM. It will have a default hostname. Check the ticket notes to find the serial numbers associated with the desired hostname. If you are setting up multiple workstation at once, its better to go ahead and rename the computers with the Component “Rename and Reboot” first, then creating a job to setup all the computers at once in the same job.
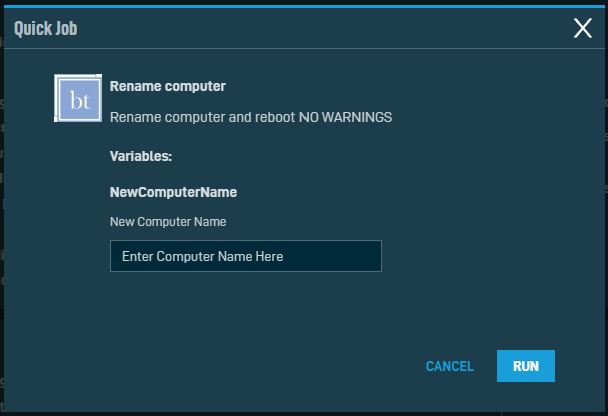
Rename the computer – Navigate to the workstation in your RMM, and run a Quick Job “Rename Computer” Enter the desired computer name in the component when ran. The computer will be renamed and reboot. When it comes back up, DattoRMM will reflect the new hostname. (if it doesnt, go to our setting up your environment section for the setting to enforce this **Link when section finished**)

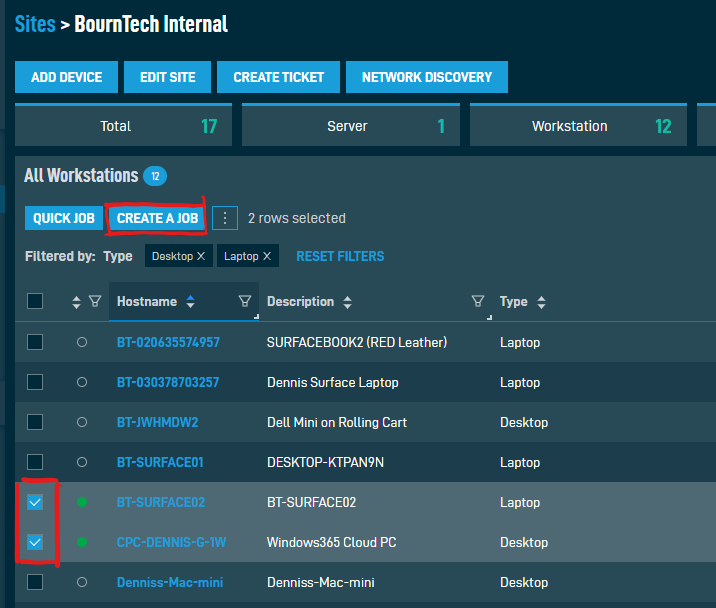
Run the rest of your Phase2 components – This can be done on multiple workstations at once. Navigate to the site, check the box for each computer to run this on, and select the “Create a Job” button.

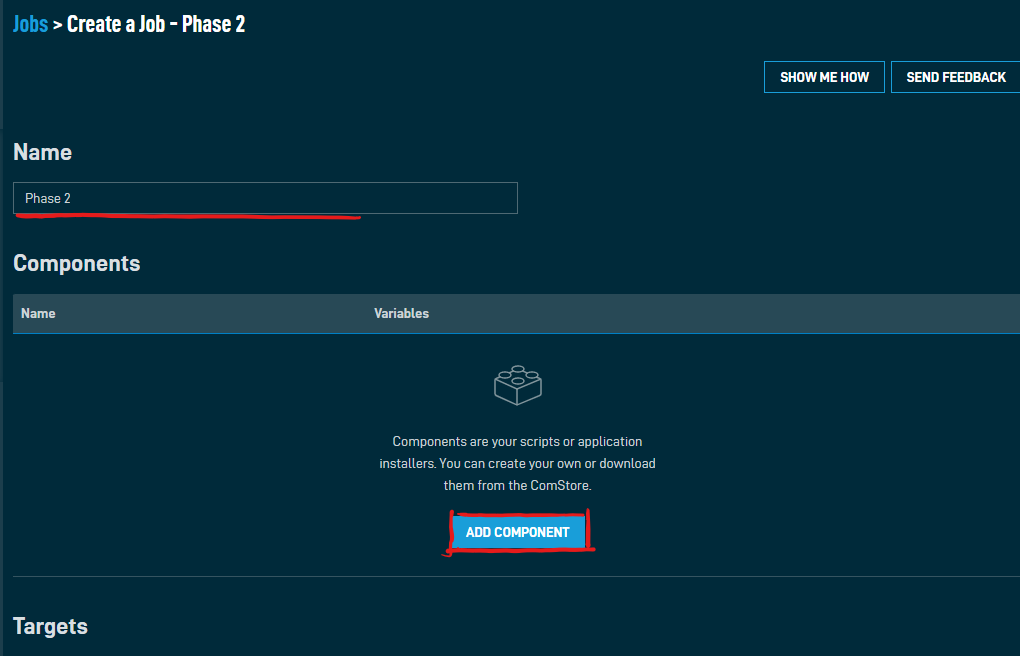
Name the job, then select “Add Component” to add your phase 2 tasks.

Filter the shown components so you only see the appropriate Phase2 tasks. If you have a single phase2 component that runs the list of components, you can run that instead.


Get exclusive insights on MSP operations, automation strategies, and business scaling tactics delivered straight to your inbox.
No fluff, just actionable SOPs, industry intelligence, and behind-the-scenes expertise from the elite operatives at Q Labs.
What you’ll receive:
📩 Sign up now and transform chaos into clockwork!
